OpenCV AI KitをROS上で使ってみた!
VPUを備えたカメラ"OpenCV AI Kit"を用いると, エッジデバイスでも負荷の高い顔認識等のDeep learning技術を実装することができます. ロボット分野でこのカメラが使用できると, ロボットの目となり, 周辺認識に役立ちます. 今回はロボット業界でよく使用されるROS向けのOpenCV AI Kitのパッケージのインストール方法を紹介します.
準備したもの

セットアップ
ROSのインストール
OpenCV AI Kitのサポート対象であるROS Melodic, ROS Noetic, ROS2 Foxy & Galacticの内, いずれかをインストールします. 今回はROS Noeticをインストールしました.

OpenCV AI KitのROSパッケージのインストール
- コアAPIのdepthai coreのインストール
- ROS 環境向けのdepthai rosのインストール
depthai coreのインストール
depthai coreのソースを取得します.
# install depthai-core
cd
git clone https://github.com/luxonis/depthai-core.git
cd depthai-core
git submodule update --init --recursive
depthai coreの依存パッケージをインストールします.
# depthai-core dependencies
sudo apt install libusb-1.0-0-dev
depthai coreをビルドします.
# build depthai-core
cmake -S. -Bbuild -D'BUILD_SHARED_LIBS=ON'
cmake --build build --parallel 4
depthai rosのインストール
次にdepthai rosの依存パッケージをインストールします.
# Install Dependencies
sudo wget -qO- https://raw.githubusercontent.com/luxonis/depthai-ros/main/install_dependencies.sh | sudo bash
vcsを利用できるようにします.
# install vcs
sudo apt install python3-vcstool
depthai rosをビルドします. catkin make時は上記でビルドしたdepthai coreのパスを指定します.
# build depthai ros
cd
mkdir -p catkin_ws/src
cd catkin_ws/src
catkin_init_workspace
cd ..
wget https://raw.githubusercontent.com/luxonis/depthai-ros/main/underlay.repos
vcs import src < underlay.repos
rosdep install --from-paths src --ignore-src -r -y
source /opt/ros/noetic/setup.bash
catkin_make --cmake-args -D'depthai_DIR=/path/to/depthai-core/build'
source devel/setup.bash
Raspberry Piでのビルドが途中で止まってしまうとき
PCと比べてメモリが小さいRaspberry Piでdepthai rosをビルドする際, メモリ不足でビルドが止まってしまうことがあります. こうしたときはSDカードの記憶領域をメモリのように扱い, メモリ不足を補います.
このような領域, スワップ領域は以下のように作成します. コマンド例では1Gのスワップ領域を作成していますが, 1Gサイズのスワップ領域を作成してもビルドが止まってしまう場合はより大きなサイズにしてみてください.
# make swap file
sudo fallocate -l 1G /swapfile

# change permission
sudo chmod 600 /swapfile

# create swap
sudo mkswap /swapfile

# activate swap
sudo swapon /swapfile

# check
sudo swapon --show

# rebuild depthai ros
catkin_make --cmake-args -D'depthai_DIR=/path/to/depthai-core/build'
udev rulesを設定します.
# set up the udev rule for DepthAI
echo 'SUBSYSTEM=="usb", ATTRS{idVendor}=="03e7", MODE="0666"' | sudo tee /etc/udev/rules.d/80-movidius.rules
sudo udevadm control --reload-rules && sudo udevadm trigger
これでビルドや設定は完了です. 試しにデモを立ち上げてみましょう.
再インストール時
.hunterを削除して, 隠しファイルに残ってしまっている依存ファイルの影響を抑えます.
depthai-coreとdepthai rosのversion違いを避けるため, それぞれのフォルダも削除して, 再インストールします.
# delete
cd
rm -r ~/.hunter
rm -r catkin_ws/src/luxonis
rm -r depthai-core

#reinstall depthai-core and depthai ros
デモ
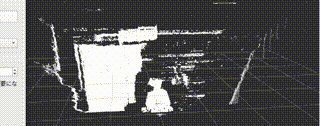
点群
点群の表示をします.
# display Point cloud
source devel/setup.bash
roslaunch depthai_examples stereo_nodelet.launch
物体認識
物体認識をします. Bounding Boxを返します.
# detect object
# terminal 1
source devel/setup.bash
roslaunch depthai_examples mobile_publisher.launch

# terminal 2
source devel/setup.bash
rostopic mobilenet_publisher/color/mobilenet_detections

おわりに
OpenCV AI KitをROS上で用いることで, 物体認識や点群を表示することができました.
ロボット制作される方はぜひお試しを!